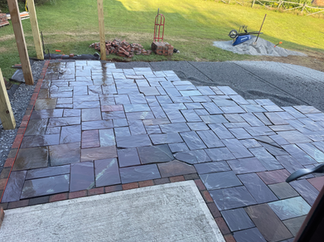
The Irregular Roofer's Slate Patio, or the "hometown special".
- Kyle Kearns
- Aug 14, 2023
- 4 min read
Updated: Oct 4, 2023
UPDATE 10/04/2023: New Photos!

On a visit to North Berwick to see their grandkids, my parents had tossed out the idea of Ajna Stonescapes building them a back patio. So, I sketched a design. And, it was good. We were off to the races.
Years back, my parents had a DIY slate patio with wide grass joints. It looked good but was difficult to maintain and heaved a lot, so it was very uneven. They had removed and stockpiled the original slate. Having about 350 sqft of slate on-hand had a lot to do with changing the planned material away from pavers. Also, when living near Granville, New York, it is hard to imagine building anything without first considering whether slate is a viable option.
Located in Washington County near the Adirondack Mountains and the New York-Vermont border, Granville gained popularity in the 1800s for its multitude of slate quarries. The rare colors of stone that were mined in the quarries led to the town being called the "Colored Slate Capital of the World". If making the journey from New York to Maine, there are several routes that guide your vehicle along rolling, mountainous mounds of slate. If you happen to like the look of slate, it is immensely difficult not to glance over at the exposed piles and think to yourself, "Yeah, I'll take a truck load of that stuff please!"

It took about a week for my parents to source the material they wanted that would match their existing slate. The choice would be a purple-hued, irregular, natural cleft, roofer's slate from Evergreen Slate Company, Inc. in Middle Granville. Some pieces were a deep purple, others more subdued. Some had a turqoise bluish-green streak or spotting. Standard size was about 10.25" width by about 19.375" length, though it varied and was almost never square. Thickness would range from 0.75" thick to sometimes over 2.0", and occasionally it would display this thickness range over a single piece of slate.

I was excited to build with local materials. It would be an immense challenge to blend new slate with the existing slate, maintain consistent joint spacing, maintain consistent pitch, and so on. Too many cuts to compensate for the difficulty would be highly inefficient and far too detrimental to the product yield. It would come to be a meaningful and beautiful patio for my parents, but also an important and true-to-brand project for Ajna Stonescapes.
The "locally-sourced" theme didn't stop at the slate. In my small, rural, hometown often cell-phone service is just partially enjoyed, almost like sunny days or good weather. Hardly something to be relied upon. So when determining the best places to get my bulk materials, I knew that Google search results may not be the most adequate. A high school classmate of mine referred me to another Hartford alumn who owned Lakeshore Excavation. Lakeshore was terrific in scheduling deliveries for full loads of 3/4" crushed clean drainage stone and top soil. We used the Jointa Galusha Hartford pit for our 3/8" crushed stone bedding layer. Nearly everything we used was supporting local small business.
As for the Morin brick border, while it wasn't sourced locally it was however re-used from a previous project. It had served previously as a brick walkway in Hampton, NH and now resides as a soldier-course border accent to a slate patio in upstate New York.
Project Operations Summary
Because the 650 sqft patio would have ample pitch, and the natural stone was non-porous and dense, we opted for a hybrid-permeable design. The excavation removed about 12" of top soil and subbgrade. We compacted the rocky subgrade soils (lots and lots of shale stone) and used a geotextile fabric to mitigate soil or silt vulnerabilities. This structural stableization fabric is non-permeable, but does a great job shuttling water to an exit point when combined with an open, clean crushed stone subbase. Which is exactly what we did, building 9" of 3/4" clean crushed stone on top of the fabric. Finally we screeded for a 1" bedding layer of 3/8" clean crushed stone. Now that we were set up -2" below finish grade we had to account for the variable slate thickness, and so each piece had to be custom leveled and set with buckets of 3/8" stone.
Since the slate standard length and width was varied, and squareness nonexistent, we quickly decided to throw away joint "line-squareness" as a critical component. Consistent pitch and joint width became the key guidelines to follow. We kept an eye on squareness and gently guided our lines back "homeward" to keep things in relative order.
We came back in dry weather to install an Alliance Gator Extreme Edge and an Alliance Gator Polymeric Sand in Slate Grey. Because the slate material is dense and non-porous, it does a wonderful job in sheeting water when installed with ample pitch. This, and smaller joint width, is why we opted to use polymeric sand for a mostly non-permeable surface. In this design, we use pitch to direct water where it needs to go. With the open, clean crushed stone subbase, any water that does permeate through the polymeric sand will not linger or pocket.
The only final touch that remains for us is the installation of decorative river round stone along the dripline and around the fence. The homeowner will be cleaning the house concrete foundation before we proceed with the decorative stone, and also completing the wooden-board privacy fence. Finally wooden stairs and a landing will be installed to access the patio from the dining-room door. There have been rumors of wooden benches to be built for along the fenceline!
As with any hardscape installation that Ajna Stonescapes completes, we went ahead and regraded the slope so that an egress around the patio exists for pedestrian traffic and so that the new grade then blends to existing grade. Any lawn areas damaged by equipment has been repaired. All new loam used for re-grading and lawn repair was nutrient-rich local top soil. We applied a local grass-seed mix, fertilizer, and hay to protect and stimulate germination.


Comments